Showing posts with label Domain Name. Show all posts

Monday, 17 June 2013

Giveaway : BlogTapper.Com Domain Name For Free

by
Giveaway:BlogTapper.Com
As you know that BloggerYard.com is a Blogger resource blog which provides the resources, tips and tricks about Blogger and we've learnt many things here. And today we're going to do something different. Today I'm giving a domain name for free to my dear readers which is BlogTapper.com. But It's totally difficult to decide to whom should I give the domain. Keeping this thing in eye, I've created the contest in which you all need to participate. After that the winner will be announced and he will be given the domain name. This is the special domain for those who are going to start an blogging niche blog. Below I've described some conditions of the giveaway which you must follow.

Giveaway Rules and Conditions

In order the win the domain, You will need to participate in the giveaway. You must be thinking what you will need to do. This is not a difficult work. You just need to follow some conditions and use the giveaway generator in which you will be asked for liking our fan page, follow us on twitter, subscribe by email and some little things. In each click you will get a entry so you've to make the more and more entries because the one who is having a lot of entries will be the winner. 

Required Things and Tips To Be Winner

  • You must have a namecheap account in order to get the domain because domain is hosted on namecheap.com. if you don't have namecheap account then you can register it.
  • You must subscribe us by email which is most important. The one who is not subscribed us will not be the winner. (Don't Worry : We'll not spam. In case, you will receive blogging tips straight in your inbox from us)
  • Make a lot of entries using the below PunchTab giveaway generator because the one who is having high entries will be the winner. Tip : Get The Refferal Link From Giveaway Generator and Share it on your every social profile. You will get one entry for each visit.
  • Share you ideas and thoughts in the comments. You comments are always appreciated. If you have any question then you can ask it in comments.
  • Now go and make the entries !

Giveaway Generator

Note : Email subscription is must, So first subscribe us!


Monday, 10 June 2013

What To Do Before/After Changing The Domain Name

by
Tips To Change Domain
Are you going to change the domain name of your blog? Before you get your domain name changed or re-branded, read this post to gain some important tips which will help you in getting your traffic, readers and ranking back to new domain. Commonly, people change their blog's domain for several reasons. In blogger, people start blogging with .blogspot.com sub domain and when they came to know that blogging is going to be their profession, they get serious in blogging and thinking about to get top level domain name for their blogs. No matter which reason you have, this post is for all who are changing domain name but one thing which is most important and you will need that is the control panel of your old domain.
Here are some tips for you which are going to help you alot. Read the passages carefully to get the point.

Inform Your Visitors First

So, First of all you've to inform your fans, readers, visitors or users that you're going to change the domain name so that they shouldn't worry if your site is not working or what. Also ask your visitors for suggesting new name for your blog. You can inform your readers by posting on Facebook Page, Tweeting on Twitter or even you can send email to your email subscribers. By this your readers will be  in attention and you will also get some good name suggestions.

Backup Your Complete Blog

So, This is also important that you should backup your whole blog so that if any big issue occurs then you may have backup of your blog for safety. Mostly, this doesn't happen to anyone but having this can really save your efforts.

Choosing Best Web Hosting Service

Now it's time to choose the best web hosting service. Best web hosting service is that service which is best for you. How best ? It can be cheapest or affordable for you, it must have easy payment methods which may appropriate with you, it's server doesn't down, great live chat support or 24x7 support. These are some things which a web hosting service must have so that you may not get in trouble in future.

Changing The Domain Name

So, It's time to change the domain name. Before you change the domain make sure that above tips you have done and you also have chosen a good name for your blog. Best web hosting service is also important so register your domain on any web hosting service which is suitable for you. Then place the new domain on your blog or setup your domain on your blog. 

Redirect Your Old Domain To New Domain [Most Important]

So, This one is the most important to redirect your old domain to new domain. By this you will continue getting traffic even if you've changed the domain. No matter from where you are getting traffic when someone will open your old URL it will be redirected to your new URL. This will also help you to get the alexa ranking and Google Page Rank back to new domain. But you will need to wait few days and it also needs hard work. In order to get Alexa ranking and Google PR back you must check that your redirect is working fine.

Redirect yourdomain.com To www.yourdomain.com

This is also important because most of people use to write only yourdomain.com is the browser and if your redirect is not enabled then it will not redirect they you might loose that visitor. You can easily redirect it by contacting your web hosting service or from where you've got the domain. If you are using Blogger then you can easily redirect to by going to Settings >> Basic >> Edit (On Domain) >> Tick mark (redirect yourdomain.com to www.yourdomain.com) and hit save button.

Publish Post About Your New Domain

Now it's time to tell your readers that you've successfully changed the domain name. Write a story that why you changed the domain name? what was the fault in old domain name? how you changed the domain name? or whatever it can be. I just want to say that write a post that must be perfect from every side and it must have some good content which must be worth reading. Also categorize that post in news or announcements category.

Re-Submit Sitemap To Google [Personal Experienced]

Now you should submit the sitemap again with your new domain. Make sure that you're using the same webmaster tools account which you've used in old domain. Don't remove the old sitemap, remain it as it is. Just again submit sitemap to Google from new domain. Before submitting the sitemap, once again make sure that your redirecting to new domain is working fine. Now submit it. You must be thinking that Google might consider your blog's content as copied content. But no way, Google is clever. He will check that both blog's owner is same or a single person then he will check that redirection is also enabled. Now what will he do ? He will just replace the old domain's search results to new domain. But this will take about one or two months to complete.

Re-Submit Sitemap To Bing and Yahoo

For Bing and Yahoo, you will have to completely remove the old domain from Bing and Yahoo webmaster tools then again submit it with new domain and also verify your new domain/blog/site. Now you have to wait about one or two months to get it indexed. After your blog is completely indexed with new domain then you will start getting traffic.

Continue Publishing Posts and Increasing BackLinks

So, All the work is done. Now you can continue publishing new posts and also working with your backlinks. This will help you to get your blog completely re-indexed easily and quickly. Your readers love your content so stay providing unique content.

Last Words

So friends, It was my personal experience which I've shared with you. I hope this little long post in gonna help you a lot. If you are facing any problem then just leave your comments below and let's face that issue. Stay connected with us for more and also subscribe us. Happy Blogging!

Sunday, 9 June 2013

Setup Custom Domain In Blogger With Namecheap

by
Install Namecheap Domain In Blogger
Namecheap.com is a popular web hosting service which is being used by millions of people. It is listed in top 10 best web hosting providers. In other side, Blogger is also famous in best blogging platforms. Blogger allows you to create about hundred blogs in a single account. You can use free sub domain forever in your blog but if you're interested in removing .blogspot.com and place only .com there then you will need to buy the domain name from any web hosting service like Namecheap, Godaddy and Hostgator. If you have bought any custom domain from Namecheap.com and want to set in with your Blogger blog then this article along with tutorial is specially for you because here we're going to learn that how can we setup custom domain in Blogger with Namecheap.

Setup Domain From Namecheap In Blogger

So, First of all make sure that you've purchased a domain from Namecheap and You're easily accessing your domain. If you've not purchased then do it now and then follow the simple steps below.
  • Go To Blogger >> Settings
  • Click on +Add a Custom Domain
  • Go To Switch To Advanced Settings
  • Now a Box Will Appear Where You Have To Enter The Domain. [i.e : www.yourdomain.com]
  • After Entering The Domain, Click "Save" Button and Then You Will See The Error Like The Below Image.
  • In The Above Error, They Are Asking To Verify Your Domain. They Have Given Two CName Records Which I've Mentioned in The Above Image, You Have To Add These CName Records In Your Domain in Order To Verify It. Simply Follow Below Steps.
  • Open New Tab in Browser and Go To Namecheap 
  • Login Into Your Account and Go To Manage Domains.
  • Open Your Domain There and Go To "All Host Records" From The Left Side Menu.
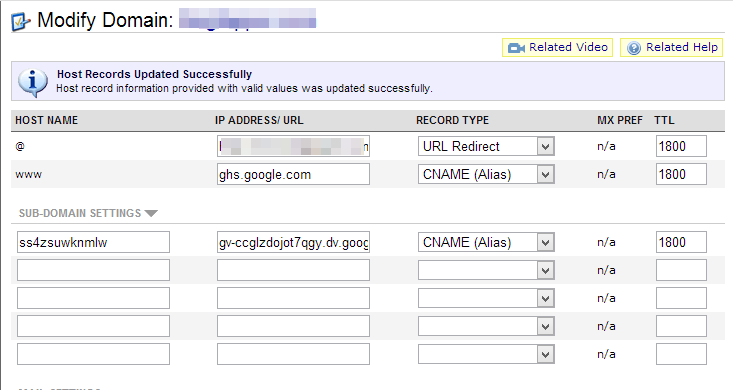
  • Now Here You Have To Create Two CNAME Records. 
  • In The Second Row, You Can See That First Column (Host Column) is Having www, in The Second Column (IP Address/URL Column) Put ghs.google.com, in The Third Column (Record Type Column) Select CNAME(Alias) and Set TTL as 1800.
  • Now Come Down at The Sub Domain Settings
  • Here In The First Row, Fill First Column With Little Code Which Is Placed Blogger at Left Side Below www, Second Column With Long Code Which Is Below ghs.google.com in Blogger, Choose CNAME(Alias) In The Record Type and The Last Set TTL as 1800.
  • Now Make Sure That You've Done Correctly and Also Confirm It By Seeing The Below Image.
  • After Adding CNAME Records Carefully Now Save Your Records By Pressing The "Save Settings" Button At The Bottom Of Page.
  • Now Open The Blogger Tab and Also Press Save Button There.
  • You're Almost Done But One Little Thing Is Remaining Which Redirecting yourdomain.com to www.yourdomain.com. This is Really Important and Not so Difficult.
  • Just Refresh The Blogger >> Settings Page and Click "Edit" In Your Domain Setting. 
  • Now a Check Box Will Appear Like The Image Below, So Just Tick it and Hit "Save" Button.
  • CONGRATULATIONS! You Have Successfully Installed Custom Domain In Your Blogger Blog. 
  • That's All!

From The Editors Desk

So friends, This was our custom Namecheap domain which we've used in our blogger blog today. So I hope that this post will you little bit in installing custom domain. If you are facing any problem then leave your comments below. We'll reply you back upon our review. Stay connected with us for more and also subscribe us to get hot updates. Take care of you and your family. Cheers!

Top Ad 728x90